A simple DIY smart home IOT project
In the previous article we connected Arduino UNO with ESP8266-01 and tried various AT commands to create an Access Point, making a connection to a Wifi Network, listening to the TCP port and passing message back and forth with AT commands. That was all basic tasting water, in the post we will step up the game and we will read sensor data from Arduino and send it to a central server and then will display that sensor data on the mobile client.
For the purpose of demonstration, we will use DHT11 temperature and humidity sensor and will send temperature and humidity data to the central server. For the server and mobile client, we will use Blynk which is has a server which collects sensor data from various devices and there is also Blynk mobile client which you can create a dashboard with drag and drop interface and play around with visualization of the sensor data.
#Components required:
- Arduino Mega
- DHT11 sensor
- ESP8266-01
- bread board
- Couple of jumper wires
#Flow of the data
Once we get the big picture of the system it will be easy to understand all the moving parts. Arduino will read data from the DHT11 sensor and send temperature and humidity data to Blynk server. We need to create an application in a Blynk mobile app to get an Auth Token which will be used to authenticate the connected device(Arduino). Arduino will send data to the central server at regular interval (say every 3 sec), this is the push model where the sensor pushes the data to the server, we could also use the pull model where the server will ask the device for the data on demand, for example, we only want to read the sensor data when the mobile client wants to read the data not interested otherwise. We will use push model in this article. Blynk also has Arduino library which will send data to the server in an efficient manner which I will describe shortly.
#Setting up central server
You cloud use Blynk hosted cloud server or you cloud setup your own, I create my own server is not really that much of a headache and plus you don’t compromise your privacy by sending your data to cloud. Just follow the step below.
-
Download the server-
.jar in a folder -
Paste the below configuration in server.properties file, place the config file in the same folder in which you downloaded the server-
.jar 1
2
3
4
5
6
7
8
9
10
11
12
13
14
15https.port=9443
http.port=8080
data.folder=.tmp/blynk
log.level=trace
enable.raw.data.store=true
admin.rootPath=/admin
allowed.administrator.ips=0.0.0.0/0
admin.email=admin@blynk.cc
admin.pass=admin
hardware.default.port=8442
hardware.ssl.port=8441
server.ssl.cert=./server_embedded.crt
server.ssl.key=./server_embedded.pem
server.ssl.key.pass=pupkin123
enable.raw.data.store=true -
Run the server with command shown in below
1
java -jar server-0.25.3.jar -dataFolder .path -serverConfig server.properties
#Setting up the mobile client and getting the Auth Token
If you are using your own server then you have to configure the Blynk mobile client to point to your server, or if you are using Blynk’s cloud server the simply sign up and create an app, auth token will be sent to you email address.
Follow below steps to create a mobile app, steps are valid irrespective of, you host your own server or using the Blynk cloud.
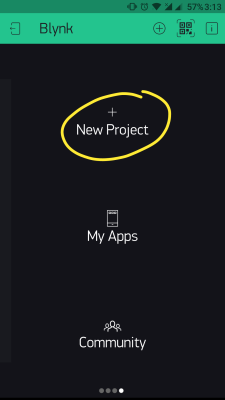
-
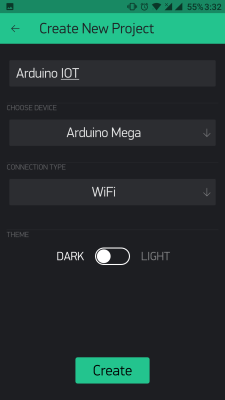
Create the application, choose device type as Arduino Mega and Connection type as WIFI
Create New Project
Choose Device type and Connection Type
-
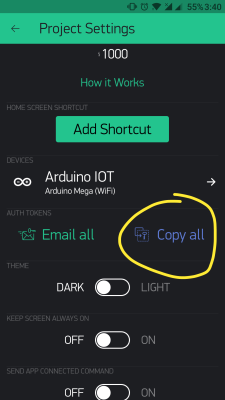
Get the Auth token by login into your local server by visiting this address https://127.0.0.1:9443/admin, or you could copy if from project setting of your mobile client and in case you are using Blynk cloud you must have got your auth token from in your email account.
#Connecting Arduino to central server
Below is the pin dialog of the Arduino setup follow it carefully and double check it, I often make mistake in this part of the project.
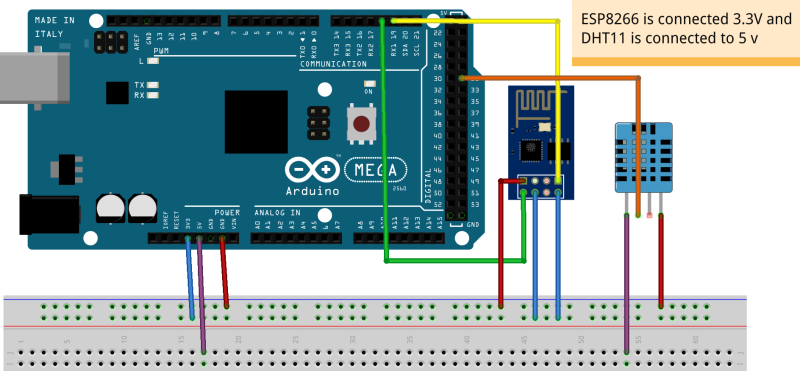
Upload this sketch to Arduino Mega we are using hardware serial1 for the communications with ESP8266-01, so be careful of the TX/RX pins of ESP8266 connecting to Arduino
1 | // this is to prints debug logs on serial console |
You must have noticed the ‘myTimerEvent’ function which reads sensor data and send to the virtual pins, one must be thinking I could have done it in ‘loop’ function but doing that would flood the server, and the server would start dropping the data which is bad. ‘loop’ function run forever and we cannot predict at what interval data is sent to the server so Blynk provides a nice way of doing it by registering a timer function which is called at configured interval.
If you are using your own Blynk setup then, your Arduino should be connecting to the same WiFi network on which your Blynk server resides.
If you have made the connections properly and uploaded the code, next open up the serial console and set the baud rate to 9600 from the drop down in the bottom corner of the console and then you should be able to see the debug logs as shown below.
1 | [999] |
#Setup Mobile client dashboard
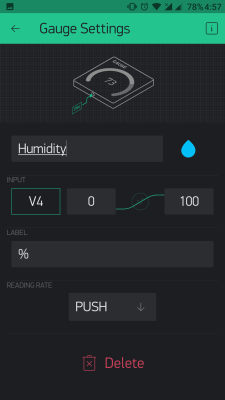
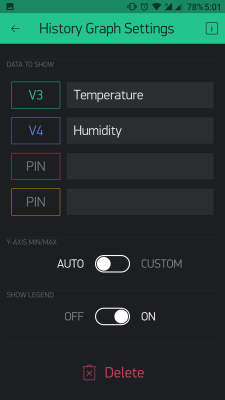
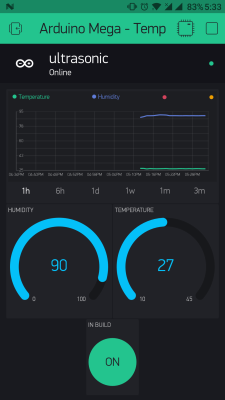
Creating dashboard is very simple, you just have to drag and drop the widgets and configure which from which pin the widgets will show the data. In our case temperature data is sent on Blynk Virtual pin 3 and humidity data is sent on virtual pin 4.
Virtual pin is the concept created by Blynk in their software ecosystem. It’s nothing complicated we just binding a particular data to a virtual pin in our case temperature to pin 3 and humidity to pin 4.
Follow the below steps to create the dashboard:
-
Open Widgets menu from the plus icon from the top left of the screen
-
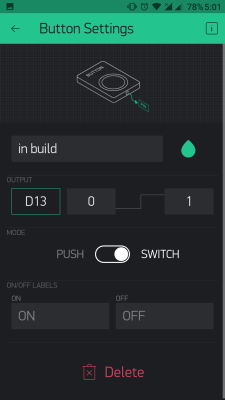
Add Widgets from the menu and make sure you properly configure them as shown below
Temprature Gauge Widget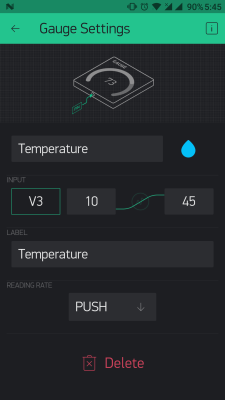
Humidity Gauge Widget
History Graph Widget : this Widget will show history of both temprature and humidity both in one graph time axis can be scaled.
Button Widget : Arduino Mega has a on board led which can be controlled from digital PIN 13
-
Final dashboard: once you have configured all the widgets properly then click the play button on the top right corner of the app and see the dashboard in action. You can also see the device status on the top which shows if the device is online or when it was last online.
#Conclusion
We successfully connected sensor with the Arduino and managed to send sensor data to the central server via ESP8266 and show it on mobile client with very few lines of code. You can also extend this project to add more sensor and add more widgets in mobile client, Blynk’s mobile client has very pretty and easy to use interface with which you can also create rules to trigger some actions like send tweets/email or send high/low signal on other Arduino pins when certain conditions are meet.