Setting up Windows 7 Machine for Kernel Debugging
Recently when I was trying to debug a malicious Windows driver and I had to setup kernel debugging environment, there were various tutorial I found using various configuration VMware, network based. But I wanted something quick and dirty which is what my setup is.
In this post we will create a kernel debugging environment for Windows 7. To do Kernel debugging you need two machines, one is the machine from which you will issue the debugging command and other machine which is been debugged. I will be talking about very specific setting i.e. two Windows 7 virtual machine in VirtualBox and the host will be Linux. You need to install WinDbg in the debugger machine.
#Basic terminology
Since we are dealing with multiple machines we need to clear about their roles, which are as follows:
- Debugger Machine: Virtual machine with the standard version of Windows 7 that has WinDbg installed
- Debuggee Machine: Virtual machine with the Windows 7 Debug Checked build, following section shows you how to do that.
- Host Machine: Machine running the virtual machines, it could be Windows or Linux.
#Setting up the Debuggee
#Making the Boot Entry
There are some setting which needed to be done to make it kernel debuggeable. Start the command prompt with Administrator privilege otherwise you will get permission error, then execute the following command :
- Create Boot entry, there is a unique UUID for each Boot entry, you will need the newly created boot ID in the next few commands, so copy it.
1 | C:\> bcdedit /copy {current} /d "Windows 7 with kernel debug via COM" |
- Turning on the debugger
1 | C:\> bcdedit /debug {UUID-RETURNED-BY-FIRST-COMMAND} ON |
- Setting up the Baud rate and the COM port number to use
1 | C:\> bcdedit /dbgsettings serial debugport:1 baudrate:115200 |
- Setting up the debug type as Serial COM port
1 | C:\> bcdedit /set {UUID-RETURNED-BY-FIRST-COMMAND} DEBUGTYPE SERIAL |
-
Verify the settings : once you have done above configuration. Type
bcdeditcommand to get the list of all boot configuration. One of those several entry you should be able to see the settings as shown below.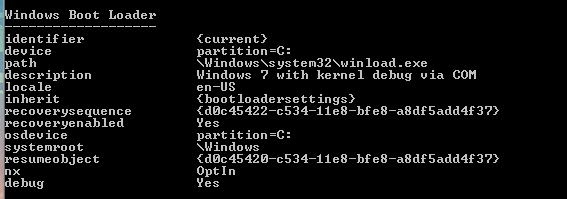
To verify the port and baudrate setting issue
bcdedit /dbgsettingscommand which should give you following output.
-
Power down this machine
#VirtualBox Setting
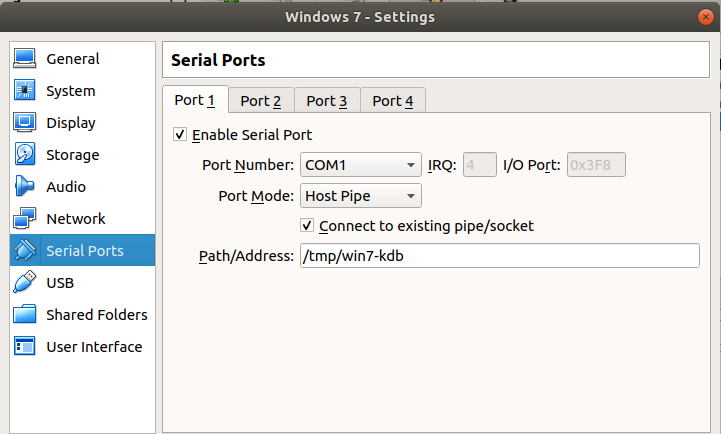
Go to the setting of the VirtualBox Manager, click Settings -> Serial Ports -> Port 1.
- Check enable serial port.
- Port Number: COM1
- Port Mode: Host Pipe
- DO NOT CHECK connect to existing pipe/socket
- Port/Address: this is the path of the pipename where the file will be created, this value depends upon the host OS which is as follows
| OS | Value (pipename) |
|---|---|
| Windows | \.\pipe\pipename |
| Linux | /tmp/pipename |
the above settings should look something like this in VirtualBox.
#Setting up the Debugger
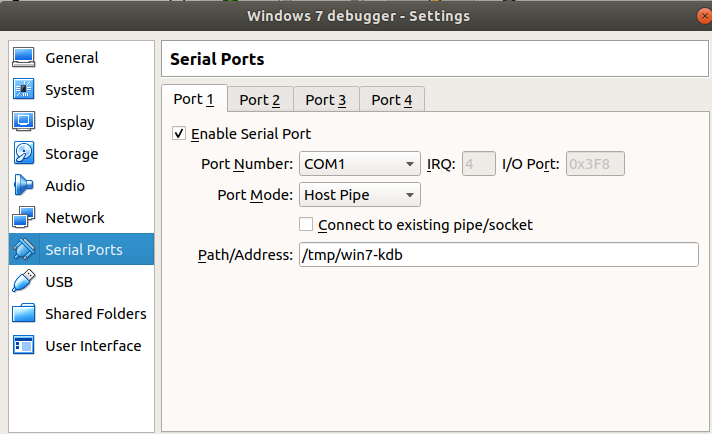
Go to the setting of the VirtualBox Manager, click Settings -> Serial Ports -> Port 1.
- Check enable serial port.
- Port Number: COM1
- Port Mode: Host Pipe
- CHECK connect to existing pipe/socket.
- Port/Address: this is the path of the pipename where the file will be created, this value depends upon the host OS which is as follows
| OS | Value (pipename) |
|---|---|
| Windows | \.\pipe\pipename |
| Linux | /tmp/pipename |
the above settings should look something like this in VirtualBox.
#Networking configuration
Network settings are also important, all the machines(Host and Guests) should be able to ping each other. For this setting you can use Host-only adapter which allows all the VM machine and the Host machines to communicate with each other, but not to external network, consequently there will be no internet access on guest machines. On the Debugger Machine you will need will need internet to download the Kernel symbols, to fix this you can add additional network adapter with NAT enabled, this should give you internet access.
#Start the Debugger Machine
First start the debugger machine, this will create the named serial port (pipename file). Debugger machine should be started first or else you will get error when starting the debuggee machine.
- Run WinDbg (GUI works fine, command line isn’t needed)
- Go to File -> Kernel Debug -> COM.
- configure the settings as shown below
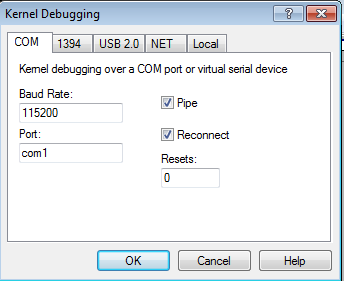
- It should say Opened \.\com1 Waiting to reconnect…
#Starting the Debugee Machine
- Once you debugger has started and your WinDBG is setup with the kernel com port setting start the debuggee machine. Once you bootup the machine you should see the below boot menu.
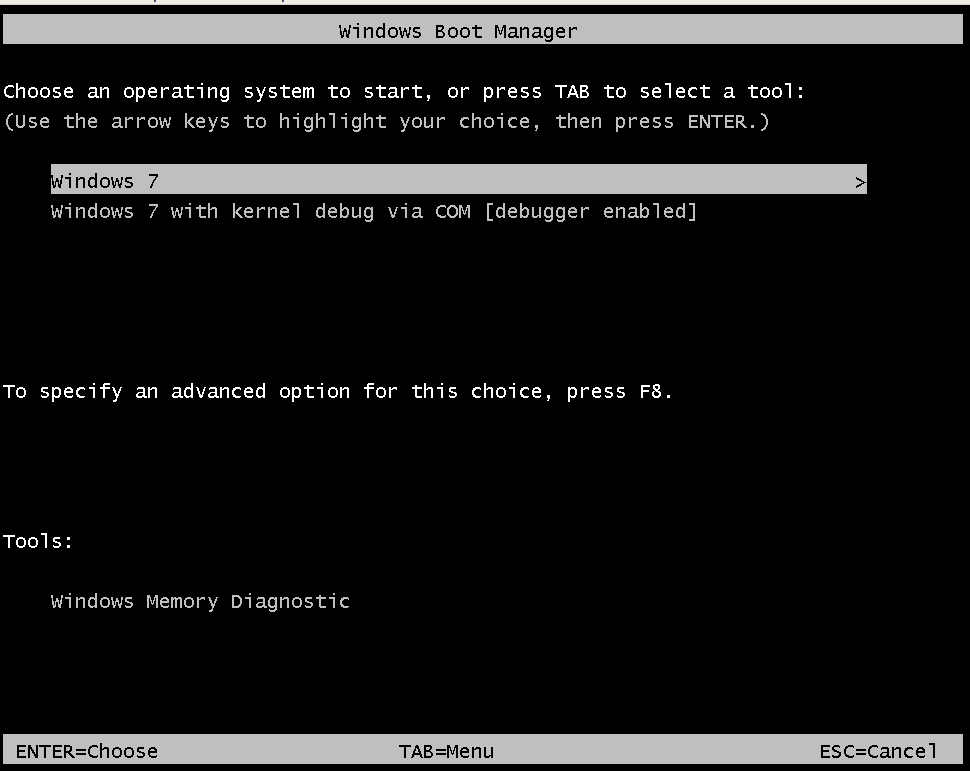 boot with the debugging enabled option.
 - If the debuggee machine is connect to the debugger machine it will boot extremely slowly and stop on the “Starting Windows” screen.
- WinDbg on the debugger machine should be connected at this point.
- When you get the message that says “Break repeatedly, break Once, Ignore, terminate Process, or terminate Thread.”
- Give WinDbg the command “g” and windows should continue to boot.
#Trouble shooting tips
#Verifing the Networking configuration
Network settings are also important, all the machines(Host and Guests) should be able to ping each other. For this setting you can use Host-only adapter which allows all the VM machine and the Host machines to communicate with each other, but not to external network, consequently there will be no internet access on guest machines. On the Debugger Machine you will need will need internet to download the Kernel symbols, to fix this you can add additional network adapter with NAT enabled, this should give you internet access.
#Verifing the Serial Port Settings
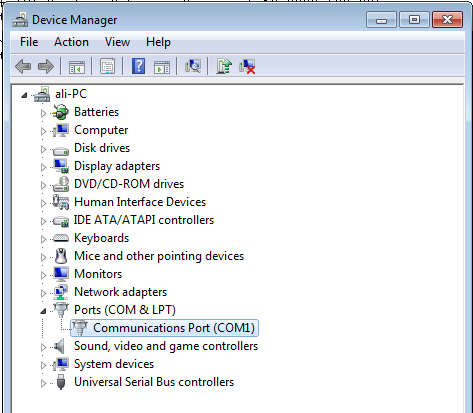
If you are facing issues with debuggee not connecting to the debugger then you can verify if there Serial port setting enabled on the machine. Go to Device Manager and check if there is serial port. If you can’t set the COM Port driver as below then you need to get it fixed somehow.
